AnyTone AT-D878UVII PLUS · Volume 3
AnyTone AT-D878UVII PLUS — Vol 3: Programming
Top-tier DMR handheld with dual-receive, Bluetooth, APRS, AES
3.1 Programming workflow
The 878’s codeplug is the most complex programming surface in the lineup — significantly more involved than any analog HT or scanner, comparable in complexity to a commercial Motorola APX codeplug. Getting it right the first time requires understanding the codeplug’s object hierarchy, the cable protocol, and the AnyTone CPS workflow.
3.1.1 Cable
The required cable is the AnyTone official programming cable (PC-58 / PC-127), USB-C on the radio end, USB-A or USB-C on the host end, containing an FT232 or CH340 USB-serial bridge IC and the K-2-pin breakout to the radio’s data lines. BridgeCom sells these for USD 25-35 mid-2026; identical-looking generic USB-C cables from Amazon/AliExpress that do not contain the FT232 will not work — they enumerate as USB charging cables only, with no data path. The diagnostic for “is this the right cable” is to plug it in (no radio attached) and check Windows Device Manager — the cable should show up as “USB Serial Port (COMx)” or similar; a bad cable shows up as nothing or as a generic HID device.
Driver-wise: modern Windows 10/11 ships with FT232 and CH340 drivers in-box and the cable will Just Work; on older Windows you may need to install the FTDI VCP driver manually (https://ftdichip.com/drivers/vcp-drivers/). On Linux the cable enumerates as /dev/ttyUSB0 (FT232) or /dev/ttyUSB0 (CH340 via ch341-uart module), no install needed, but the AnyTone CPS is Windows-only so you’ll be running it under Wine or in a Windows VM — see Vol 3 §4 ↗ for the cross-platform programming-software treatment. The CHIRP project has experimental D878UV support but does not handle the DMR talkgroup / contacts / roaming complexity — useful for pure analog-channel emergency edits but not a full CPS replacement.
3.1.2 Software — the canonical AnyTone CPS
The AnyTone D878UV(II)(PLUS) CPS is the vendor-supplied configuration tool — Windows-only, free download from BridgeCom (https://www.bridgecomsystems.com/pages/anytone-software), version-locked to firmware family. The current as of mid-2026:
- D878UVII PLUS firmware V4.00 release 250815 pairs with CPS V4.00 (released August 2025)
- D878UVII PLUS firmware V3.04 (earlier bootloader generation) pairs with CPS V3.04
- The older D878UVII (non-PLUS) family runs CPS V2.04 against firmware V2.04 — separate product line in BridgeCom’s listings
The CPS version must match the radio firmware family. Cross-version CPS-vs-firmware combinations produce confusing failure modes (CPS reads the codeplug but the channel definitions are corrupted on write; or the write succeeds but the radio displays “wrong codeplug” on boot). Always download the BridgeCom bundle that matches your radio’s firmware — the bundle ships as a ZIP with both CPS + firmware in the same release, and they are tested together.
Third-party tools that supplement the canonical CPS:
- CPSProgrammer (community, free) — read/write codeplugs without the full CPS UI, useful for scripted backup
- AnyTone-Sync (community, free) — sync codeplugs across multiple radios, useful when you have two 878s and want them on the same channel set
- DCS-CodePlugMaster (community, paid USD ~30) — alternative CPS editor with better diff/merge and CSV import/export than the AnyTone CPS
- dmrconfig (community, OSS C++) — CLI tool that reads/writes 878 codeplugs from a text file; the “infrastructure-as-code” answer for codeplug management. Limited to a subset of CPS features (no encryption-key handling, no AT_Options-specific fields) but excellent for version-controlled codeplug workflows. Source at
https://github.com/sergev/dmrconfig.
3.1.3 The codeplug object model
The codeplug’s hierarchy is the single most confusing thing about the radio for a new owner. Five interrelated object types, with cross-references:
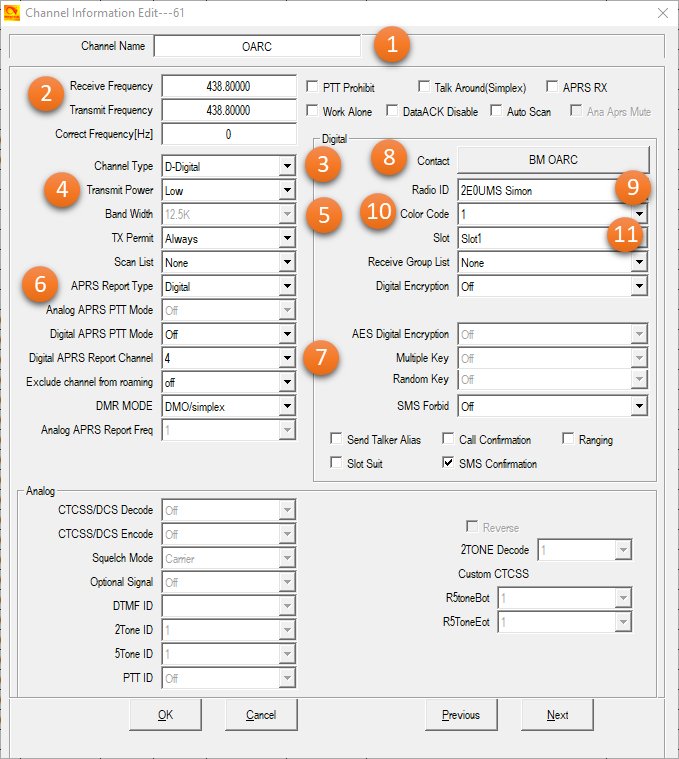
Channels are the leaf — one entry per RF channel (DMR or analog). Each channel carries:
- Channel name (16 chars)
- Channel type (Analog / DMR)
- RX freq, TX freq (separate — for a repeater, TX = RX + offset)
- TX power (Turbo / High / Mid / Low — roughly 7W / 5W / 2.5W / 1W on VHF, 6W / 4W / 2W / 1W on UHF)
- Bandwidth (12.5 kHz / 25 kHz)
- For analog: CTCSS/DCS encode + decode tone, squelch type
- For DMR: colour code, slot, contact (the talkgroup), RX group list, scan list, optional encryption key, optional APRS report config, optional roaming zone reference
Talkgroups (Contacts) are the DMR addresses — a talkgroup is a triplet of (Talkgroup Number, Call Type, Slot). Examples: (91, Group Call, Slot 2) is the BrandMeister Worldwide English talkgroup on slot 2; (3162, Group Call, Slot 2) is the Michigan statewide talkgroup. Talkgroups are referenced by channels, and are also stored in the “Digital Contacts” list (separate from the radioid.net DB which is the “Digital Contact List” — confusingly named) for direct call lookup.
RX Group Lists are sets of talkgroups that a channel listens for in addition to its primary contact. If a channel has talkgroup 3162 as its primary and an RX group list containing TGs 91, 3100, and 31620, then receiving on that channel will decode any of {3162, 91, 3100, 31620} traffic on the channel’s slot. Used to subscribe to multiple talkgroups on a single repeater without separate channel entries per TG.
Zones are collections of channels (up to 250 channels per zone), and they are the user-facing organisation unit — the channel-knob selector navigates within a zone, and the zone-select button (default a long-press of the SK1 button) switches between zones. Typical zone layout: one zone per local repeater (containing all the talkgroups available on that repeater as separate channel entries), one zone per hotspot (containing all the talkgroups you care about), one zone for analog repeaters, one zone for simplex, one zone for travel.
Scan Lists are channels to scan in order when scan mode is activated. Per-list config of priority channel (always listen for activity), look-back time, dropout delay.
Roaming Zones (DMR-specific) are channels-with-same-talkgroup across multiple repeaters, for the auto-switch behaviour described in §3.
Hot Keys / One-Touch Entries are 20 programmable keypad shortcuts (e.g. # + 1 = “send my position to TG 5057”) for common operations.
The object model has many-to-many relationships everywhere: a talkgroup is referenced by many channels, a channel references one talkgroup but many RX-group-list talkgroups, a scan list references many channels, a roaming zone references many channels (which must all reference the same talkgroup), etc. Editing in the CPS without understanding the full graph is how codeplugs get corrupted.
3.1.4 The workflow
The practical authoring sequence:
-
Define DMR contacts (talkgroups) first — populate the Digital Contacts table with every talkgroup you might ever want to reference. Easier to start with the BridgeCom-provided “starter” contact list (downloadable, contains the canonical BrandMeister + TGIF talkgroups) and edit from there. The Digital Contact List (the 200k radioid.net dump) is separate and is imported once via the dedicated “Digital Contact List” CPS menu — see §5 for the source CSV.
-
Define RX group lists — group your talkgroups into RX-list sets per local repeater / hotspot pattern.
-
Define channels — one per (frequency, slot, primary talkgroup) tuple. For DMR repeaters with many talkgroups, this means many channels per repeater. Naming convention matters; the standard is
<Repeater>-<TGname>or<HS>-<TGname>(Hotspot prefix), 16-char limit so abbreviations are forced. -
Define zones — group channels by repeater/hotspot/use. The first zone in the list is the default-on-power-on zone.
-
Define scan lists — for each zone you want to scan, build a scan list referencing the channels in that zone.
-
Define roaming zones (optional) — for talkgroups that exist on multiple geographic repeaters.
-
Configure encryption keys (only if you’ve thought hard about §3 — and even then, configure but don’t enable on amateur channels).
-
Configure APRS — beacon interval, beacon path, GPS report destination talkgroup.
-
Set radio-level options — DMR ID, callsign, intro screen, boot-up pic, key-tone, backlight timeout, power-save mode, etc.
-
Write the codeplug to the radio: CPS → Program → Write to Radio. Full image including the contact DB takes ~3 minutes on a USB 2.0 host; codeplug-only (without DB) is ~20 seconds.
Worth doing on paper first: sketch the zone-to-channel-to-talkgroup mapping before opening CPS. The CPS UI is dense and not forgiving of “let me just rearrange these” experimentation — a mid-edit zone reordering can leave channel references dangling.
3.1.5 AT_Options expansion
AT_Options is the BridgeCom-distributed firmware expansion package that adds features beyond the base firmware: AES-256 encryption (the most-discussed feature, see §3 caveat), expanded language support, an additional FM broadcast receiver tuner option, expanded GPS NMEA output, additional Bluetooth profiles. The AT_Options bundle ships as a separate flash image and is loaded via the same firmware-update procedure as a regular firmware update — but the load is destructive of the codeplug (the encryption key indexes shift) so always back up the codeplug and the AT_Options image and the base firmware before loading.
The bundle filename pattern is AT_Options_v9.zip (current major as of mid-2026 is v9; older v7/v8 archives may still be in the system for the V3.04 / V2.04 firmware families respectively). The AT_Options enable code is a per-radio activation key that BridgeCom sends after purchase; the key is tied to the radio’s IMEI / serial number and is not transferable. Lose the key and BridgeCom will reissue against your purchase record; lose both the key and the purchase record and you’re buying AT_Options again.
3.1.6 Backup before edit — non-negotiable
DMR codeplugs are intricate enough that a partial write or an interrupted programming session can render the radio unbootable. The recovery procedure (BridgeCom’s “factory reset and re-program” guide) takes 30-60 minutes and assumes you have a working codeplug to write back. Always read the current codeplug out and save it to a versioned file before any write operation. The codeplug is the single most valuable artifact in the entire DMR setup — it represents hours of authoring work, and CPS does not auto-version.
See §5 for the backup discipline and file paths.
3.2 Codeplug backups
The local backup hierarchy lives under ../../programs/anytone-d878uvii/ (relative to this volume source). Structure:
programs/anytone-d878uvii/
├── CodePlugs/                    ← versioned .rdt codeplug snapshots
│   ├── 2026-05-20_pre-WPSD-edit.rdt
│   ├── 2026-05-22_post-WPSD-edit.rdt
│   ├── 2026-05-24_current.rdt
│   └── README.md                 ← change-log per codeplug
├── Custom Boot Pic/              ← startup-screen bitmaps
│   ├── N0SWN_callsign_160x110.bmp
│   ├── N0SWN_callsign_160x110.png
│   └── bmp-conversion-notes.md
├── Firmware/                     ← .spi firmware archives
│   ├── D878UVII V2.04/           ← original 878 II (non-PLUS) firmware
│   │   ├── D878UVII_V2.04_official_release.zip
│   │   ├── CPS_V2.04.zip
│   │   ├── AT-D878UVII-PLUS-USER-MANUAL.pdf
│   │   ├── AT-D868UV_D878UV_Programming_Guide_1.33.pdf
│   │   └── JSON_to_CSV_converter.exe
│   ├── D878UVII V3.04/           ← pre-BL_v2 II PLUS firmware
│   │   ├── D878UVIIPLUS_V3.04.zip
│   │   ├── CPS_V3.04.zip
│   │   └── release_notes.txt
│   └── D878UVII V4.00/           ← current BL_v2 II PLUS firmware (250815 release)
│       ├── D878UVIIPLUS_V4.00_250815.zip
│       ├── CPS_V4.00.zip
│       ├── roaming_wizard_guide.pdf
│       └── release_notes.txt
├── AT_Options_v9.zip             ← AES + extended features
├── AT_Options_key_N0SWN.txt      ← per-radio activation key (do NOT commit publicly)
├── Contact_DB/
│   ├── 2026-05-20_radioid_dump.csv
│   └── README.md
└── README.md ← top-level index for this directoryCadence: re-backup the codeplug on every meaningful edit, before every firmware update, and after every successful firmware update (the post-update read is the verification step that the new firmware can correctly serialise the codeplug). Filename convention: YYYY-MM-DD_short-description.rdt. The README in CodePlugs/ carries a per-file change log: what was added/removed, why, and what the test result was (e.g. “added TG 31660 Michigan Statewide on Slot 2 of WPSD hotspot; tested with hotspot at 145.575 simplex, decoded successfully”).
Most recent backup as of this writing: TBD — to be filled in when the codeplug is next read for an edit.
Firmware update procedure (for completeness):
- Read current codeplug → save as
YYYY-MM-DD_pre-fw-update.rdt - Power off radio, hold PTT + SK1, power on → enters bootloader mode (display shows “MCU UPDATE”)
- Connect cable; run the firmware updater (in the firmware ZIP) → select the .spi file → write
- Power-cycle radio; verify it boots cleanly and shows the new firmware version in the boot-info screen
- If AT_Options is enabled, re-flash AT_Options against the new base firmware (it’s bundled separately and order matters: base firmware first, then AT_Options on top)
- Write the saved codeplug back; verify the radio responds correctly on a known channel
Recovery from bricked radio: hold PTT + SK1 + the side PA button on power-on enters the recovery bootloader (different from the regular bootloader mode); the BridgeCom recovery firmware ZIP includes the matching writer tool. This has rescued every brick encountered in the wild, but takes 30-60 minutes per recovery.
The Custom Boot Pic is a 160 × 110 monochrome bitmap displayed at power-on. The N0SWN callsign boot pic lives in the Custom Boot Pic subdirectory as both the .bmp ready-to-flash format and the .png source. Bitmap conversion uses the BridgeCom-supplied tool or the community D878UV_BootPic_Converter Python script (in the same directory). See §7 for the workflow.
The Contact DB subdirectory holds dated CSV dumps from radioid.net for traceability — when the contact database lookup gives a wrong name for an ID, the diff against the most recent dump narrows down whether it’s a stale local DB (re-import the newer dump) or a radioid.net data issue.
The AT_Options activation key is per-radio and per-license; the key file is kept in this directory but should not be committed to a public repository — it contains the radio’s serial number cross-referenced with the BridgeCom-issued activation code. Hack Tools repo is private (see ../CLAUDE.md discussion of MY_GEAR sensitivity); the key file lives here for the same reason.
Comments (0)