SkyBridge Plus · Volume 3
SkyBridge Plus — Vol 3: Configuration & Backups
BridgeCom commercial DMR hotspot — turnkey appliance
3.1 Hotspot configuration workflow
The SkyBridge Plus is web-managed end to end — once it is on the local network there is no command-line discipline required to configure it for normal operation. The configuration sequence below is for first-power-up out of the box.
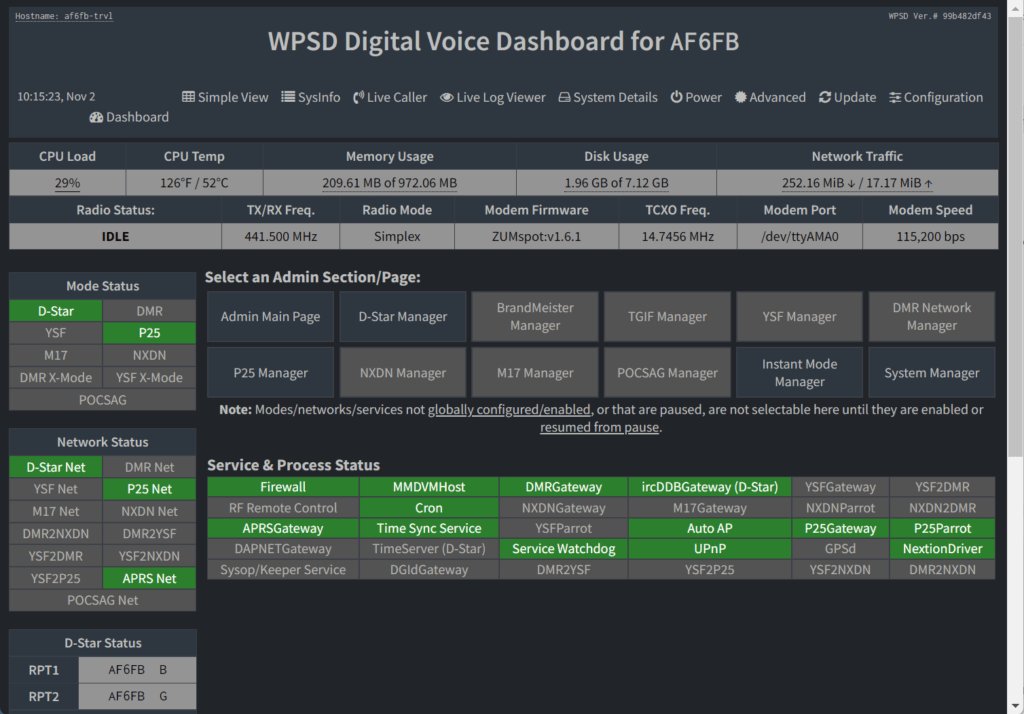
3.1.1 Onboarding — Ethernet first, or a Wi-Fi file on the card
The SkyBridge Plus has a built-in Ethernet port, and plugging it into the home router is the simplest first connection. For Wi-Fi, BridgeCom’s current reimaging guide uses the WPSD method: create a Wi-Fi configuration file with the WPSD WiFi Config File Generator (https://w0chp.radio/wifi-config-generator/) and copy it onto the microSD card’s boot drive before first boot. Pi 3B-based units join 2.4 GHz networks only; Pi 4B-based units (two blue USB ports) also join 5 GHz. A captive-portal “setup access point” onboarding flow described in some write-ups appears in no BridgeCom document found and could not be confirmed. Either a wpa_supplicant.conf or a NetworkManager .nmconnection profile brings the unit onto Wi-Fi as a DHCP client; neither file should be published, since it carries the passphrase and an SSID that public Wi-Fi location databases can map.
3.1.2 Finding the device on the LAN
After the SkyBridge joins the home network it takes a DHCP-assigned IP address, which BridgeCom notes is shown in the upper-left corner of the SkyBridge’s screen. Point a browser at that address, or at the hostname: http://skybridge.local/ on the WPSD SkyBridge image (per the WPSD download page), http://pi-star.local/ on BridgeCom’s older Pi-Star-based software (per BridgeCom’s backup article). Default login credentials are pi-star / raspberry on both — change them on first login from the dashboard’s Configuration > Security panel. The WPSD dashboard is the entire administrative surface.
3.1.3 Core configuration items
In the WPSD dashboard’s Configuration panel, fill in the following for a working DMR hotspot:
- Callsign — the operator’s amateur callsign (N0SWN in this setup). Used as the identifier on every DMR transmission and on the dashboard.
- DMR ID — the 6- or 7-digit DMR ID from radioid.net, registered against the operator’s amateur callsign with proof-of-license. The same DMR ID is used in the radio’s codeplug (Vol 8 §6 ↗).
- Frequency (TX and RX) — the hotspot’s operating frequency. For simplex operation, TX = RX; for duplex, set the +/- offset. Pick a frequency in the local repeater coordinator’s published low-power-simplex / hotspot allocation. 70 cm common choices in the US fall in the 433-435 MHz range; verify against your local repeater plan before committing.
- Colour code — DMR’s per-channel layer-1 squelch tone, integer 0-15. Convention for a personal hotspot is CC 1, which is also the value in BridgeCom’s 2021 default configuration (
ColorCode=1, simplexDuplex=0, 446.550 MHz placeholder frequency) and matches the default on a fresh AnyTone D878 channel. - TX power — typically 10-20 mW on the hotspot. MMDVMHost separates RFLevel (RF output as a percentage of the modem’s maximum) from TXLevel (modulation level); BridgeCom’s 2021 default configuration sets
RFLevel=100andTXLevel=50. The modem’s actual output at 100 % depends on the board, which is not yet confirmed for this unit. The hotspot is a same-room companion to the radio; it does not need more power. See §7 for the “don’t try to extend range” point. - Network selection — choose one or more of BrandMeister / TGIF / W0CHP / DAPNET / FCS / XLX. Each network has its own dashboard sub-panel with a server hostname, a personal API key (BrandMeister and TGIF require account registration on the network’s website to issue a key), and a connection-status indicator. The BridgeCom factory image pre-populates the network server hostnames; the user fills in the API keys.
- Talkgroup routing — split between static talkgroups (always-on, the hotspot transports traffic from these talkgroups onto the local RF channel without requiring the radio to key) and dynamic talkgroups (the hotspot subscribes when the radio keys to that talkgroup, holds the subscription for a timeout period (typically 15 min), then releases). The static / dynamic distinction is a BrandMeister network concept; TGIF handles it differently. See Vol 2 §6 (Talkgroup hygiene) ↗ for the operational treatment.
- Modem type — the dashboard’s Modem panel; pick the MMDVM hat model that matches what’s installed in the SkyBridge. The BridgeCom factory image has this pre-set correctly; only change it if the hat has been swapped.
The dashboard’s Save button writes the changes to the WPSD config tree under /etc/pi-star/ (the legacy WPSD path retained for backward compatibility with the upstream Pi-Star tooling), restarts the affected daemons (MMDVMHost, DMRGateway, etc.), and shows the new state in the live dashboard panels within ~10 seconds. No reboot is required for any change other than network-mode toggles.
3.1.4 Firmware updates
There is no separate BridgeCom firmware stream to track. BridgeCom’s 2022 blog describes updating the Pi-Star-based SkyBridge with Pi-Star’s ordinary Update button on the dashboard, which pulls the upstream Pi-Star updates. A dedicated “BridgeCom update server” behind the dashboard’s Update panel could not be confirmed and should not be assumed. Moving between operating-system generations (Pi-Star to WPSD, or WPSD Bookworm to Trixie) is not an in-place update: it means reimaging the microSD card with the WPSD image built for the SkyBridge MAX and SkyBridge Plus, which is what BridgeCom’s current “Micro SD Card Reimaging Steps” guide links. BridgeCom states that image link is intended to be used under the instruction of a BridgeCom technical-support representative, and that damage from removing and flashing the card is not guaranteed to be covered under warranty. The image and BridgeCom’s factory default configuration are listed at https://radios.fubsypoly.com/downloads/#skybridge-plus.
3.1.5 Optional advanced configuration
For the operator who wants more than the dashboard exposes, SSH is available — ssh pi-star@skybridge.local, password raspberry (change on first login). The SSH access opens up the underlying Linux filesystem, the WPSD daemon configurations, and the standard MMDVMHost / DMRGateway / YSFGateway config files. BridgeCom’s support stance is that SSH access is unsupported — if you change something via SSH and break the dashboard, you’re on your own to fix it — but the door is open. Most operators never need to. The configuration items that occasionally justify SSH access: editing the MMDVMHost RxLevel and TxLevel parameters more finely than the dashboard’s slider, custom cron jobs for log rotation, manually editing DMRGateway.ini for advanced routing rules. For routine operation the dashboard is enough.
3.2 Network config backups
BridgeCom’s own article (“How to Backup and Restore Your SkyBridge Plus Configuration”) documents the dashboard’s Configuration > Backup/Restore page: the green down-arrow saves the current configuration as a zip, and Choose File plus the green up-arrow loads one. BridgeCom also publishes a factory default configuration zip (dated 2021-10-28, made for the Pi-Star-based software) that returns the unit to factory settings — uploaded as-is, never unzipped; whether a WPSD-based SkyBridge accepts it could not be confirmed. The panel exports the entire /etc/pi-star/ config tree plus MMDVM.ini, MMDVMHost.ini, DMRGateway.ini, the YSF/NXDN/P25/M17 gateway INIs, and the Wi-Fi credentials into a single timestamped ZIP file. The ZIP is downloadable through the browser to the local machine; restore is the inverse — upload the ZIP through the same dashboard panel and the WPSD stack writes back the saved tree and restarts the daemons. The Backup/Restore mechanism is the only sanctioned way to migrate a configuration between SkyBridge units (e.g. RMA replacement) or between major firmware updates.
A complete backup set, kept off the SD card, is the dashboard export ZIP above, the Wi-Fi credentials as a wpa_supplicant.conf or NetworkManager .nmconnection profile (needed only if the unit runs on Wi-Fi rather than Ethernet), and a configuration record — serial number, DMR ID and callsign, TX/RX frequency, colour code and slot, static talkgroups, network logins — as the cross-check against what the dashboard shows. Re-export quarterly, before every image update, and after any configuration change; keeping the dashboard’s own file name (WPSD_Config_<hostname>_YYYY-MMM-DD.zip) keeps them in date order. None of these files should be published: the Wi-Fi files carry the passphrase and an SSID that public Wi-Fi location databases can map, and the exports can carry network API keys.
Restore workflow (the recovery procedure if the SkyBridge SD card fails or the image is corrupt):
- Reimage the microSD card per BridgeCom’s “Micro SD Card Reimaging Steps”: download the WPSD SkyBridge MAX/Plus image; in Raspberry Pi Imager choose Device → No Filtering, OS → Use custom (the downloaded
.img.xz), then the card; answer No to OS customisation. Optionally copy a Wi-Fi file from the WPSD WiFi Config File Generator onto the card’s boot drive (or use Ethernet). - First boot: the screen shows “Initializing…” while the image runs background tasks and reboots once — do not remove power.
- Log into the dashboard at
http://skybridge.local/(pi-star/raspberry), change the default password. - Configuration > Backup/Restore > Upload the most recent WPSD_Config zip → click Restore. The dashboard unpacks the config tree and restarts the daemons.
- Verify the dashboard shows the expected callsign / DMR ID / frequency / talkgroups; verify the hotspot connects to BrandMeister and TGIF; key the AnyTone on the configured frequency and confirm the LED behaviour and the dashboard’s “Last Heard” list shows the transmission.
End-to-end recovery takes 15-30 minutes given a fresh SD card and the most recent backup. Without a backup, the recovery falls back to re-entering all the configuration items from the SkyBridge Plus.xlsx — which is precisely why the spreadsheet is the cross-check.
Comments (0)