WPSD DIY Hotspot · Volume 3
WPSD DIY Hotspot — Vol 3: Configuration & Backups
Hand-built Pi + MMDVM duplex + Nextion display
3.1 Hotspot configuration workflow
The DIY hotspot’s configuration is end-to-end web-managed once the WPSD image is on the SD card and the Pi is on the network, exactly as the SkyBridge is. The difference is that the configuration starts earlier — you have to flash the SD card, do the initial Wi-Fi/Nextion setup, and pick the MMDVM hat type yourself, all before the first dashboard interaction. The SkyBridge ships pre-flashed; this hotspot ships as a stack of parts.
3.1.1 Step 1 — Flash WPSD to the SD card
The canonical starting point is downloading the current WPSD image from the W0CHP project website (https://w0chp.radio — the download page hosts versioned releases plus the nightly), unzipping it to a ~3 GB .img file, and writing that image to a microSD card with Raspberry Pi Imager (Imager is the easiest tool; Balena Etcher and dd are equivalent). The image is a complete Debian-based Linux system with WPSD pre-installed, configured for the typical Pi GPIO and UART layout, and ready to boot once Wi-Fi credentials are provided.
For comparison: the SkyBridge ships with this step already done at the factory, and you’d only redo it on RMA-replacement or if the SD card fails (Vol 21 §5 ↗). On the DIY hotspot, this is the first task at first-build and the recovery task whenever an upstream WPSD upgrade goes sideways or the SD card fails. The Samsung PRO Endurance / SanDisk High Endurance microSD recommendation from §2 (Hardware tour) is load-bearing here; a consumer microSD eventually corrupts under WPSD’s logging workload, and the recovery is “re-flash and re-upload the most recent WPSD_Config_*.zip backup.”
3.1.2 Step 2 — First boot and Wi-Fi onboarding
On first power-up, WPSD does the same Wi-Fi-AP-mode captive-portal trick that the SkyBridge does (Vol 21 §4 ↗): the Pi advertises an open SSID like “WPSD-Setup” or “Pi-Star-Setup,” a phone or laptop joins that SSID, the captive portal prompts for the home Wi-Fi SSID and PSK, and the Pi writes wpa_supplicant.conf to the boot partition and rejoins as a client. The DIY-hotspot variant: if the Pi has Ethernet (the Pi 4B / 3B+ both do; the Zero 2 W doesn’t), you can skip the Wi-Fi onboarding entirely and just plug an Ethernet cable into the home network — the Pi will DHCP up and be reachable immediately at its assigned IP or at pi-star.local / wpsd.local via mDNS.
The archived Wi-Fi credentials are in programs/wpsd-hotspot/wpa_supplicant.conf.docx (the .docx is just a Word-wrapping container; the actual content is the standard wpa_supplicant.conf format with the network={…} block specifying the home SSID and PSK), and the NetworkManager-style profile programs/wpsd-hotspot/FBI_Surveillance_Van__3.nmconnection carries the same credentials in the modern NetworkManager format (UUID c116fac3-8a64-45dd-9d54-008399e8b4a0, SSID FBI Surveillance Van #3, PSK redacted-in-public-discussion-but-stored-in-the-file; the same home Wi-Fi the SkyBridge connects to per Vol 21 §5 ↗). Either flavour can rebuild the Wi-Fi connection if it has to be reconstructed from scratch.
3.1.3 Step 3 — WPSD dashboard onboarding
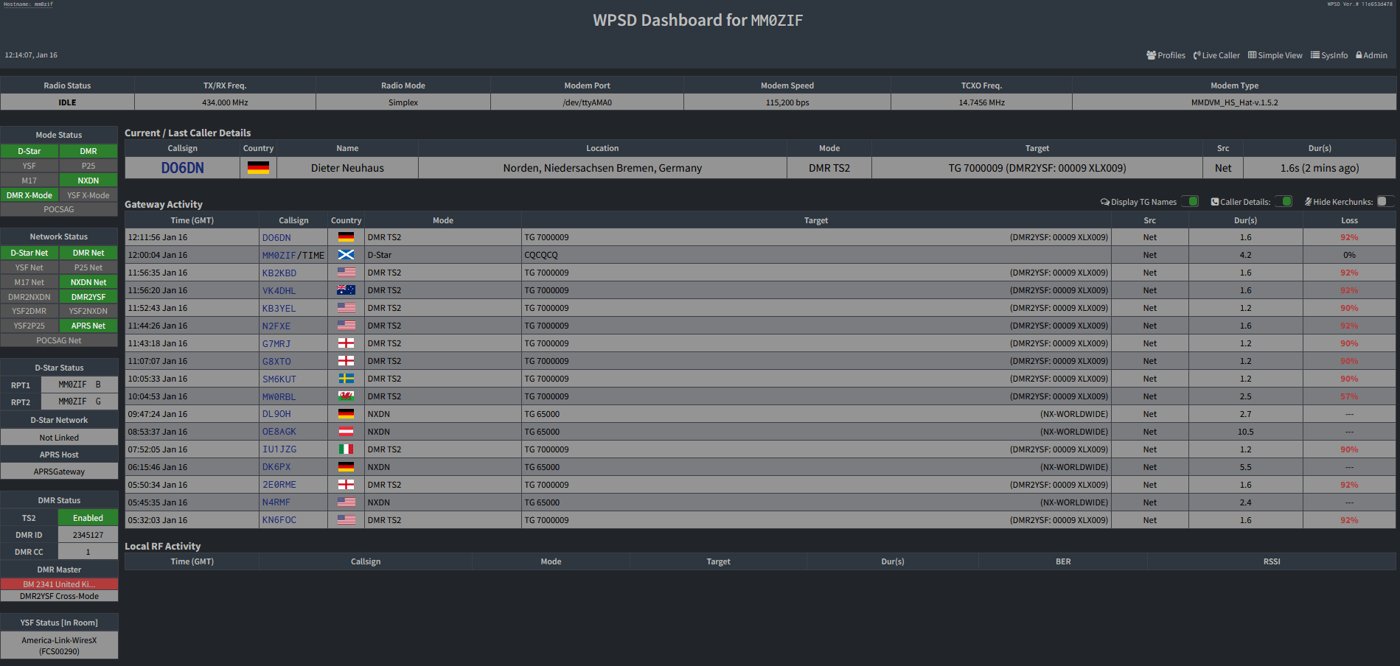
Once the Pi is on the network, point a browser at http://pi-star.local/ or the assigned IP — the WPSD dashboard appears. Default login is pi-star / raspberry (the upstream WPSD default, inherited from mainline Pi-Star; change immediately on first login from the dashboard’s Security panel). The dashboard’s Configuration page is the same as the SkyBridge’s, with the same fields:
- Callsign — the operator’s amateur callsign (N0SWN, the same as in the AnyTone D878’s codeplug per Vol 8 §6 ↗ and the SkyBridge per Vol 21 §4 ↗).
- DMR ID — the 6- or 7-digit RadioID.net-issued DMR ID; same as in the D878 codeplug.
- Hostname —
tjs-duplex(current; the latest backup file is named after this hostname). The earlier hostname waspi-star-duplex(per theprograms/wpsd-hotspot/pi-star-legacy/Duplex/Pi-Star_Config_pi-star-duplex_2022-Apr-20.ziparchive); renamed at some point during the Pi-Star → WPSD migration. - Frequency (TX and RX) — separate values for the duplex setup. The standard amateur 70 cm repeater offset is 5 MHz, so for example TX at 442.700 MHz and RX at 447.700 MHz; verify against the local repeater coordinator’s published low-power simplex/hotspot allocation before committing.
- Colour code — CC 1 by community convention; this matches the AnyTone D878 default and the SkyBridge’s CC.
- Modem type — pick the duplex modem variant matching the installed hat. For a ZUM Radio MMDVM_HS_DUAL_HAT, the WPSD dropdown entry is “MMDVM_HS_Dual_Hat” (or similar — exact text varies by WPSD version); the Jumbo-Spot Duplex and BI7JTA equivalents appear in the same dropdown. Pick wrong and the hat may not initialize or may run at the wrong frequencies.
- TX power / TX Level — the MMDVM hat’s “TX Level” parameter (0-255 numeric). 60-80 corresponds to roughly 10-20 mW EIRP — same low-power-is-good-on-a-hotspot argument as the SkyBridge (Vol 21 §4 ↗). Resist the temptation to crank this up; the antenna proximity argument from Vol 21 §6 ↗ applies equally.
- Network selection — pick BrandMeister, TGIF, W0CHP, and/or the FCS/XLX reflector ecosystem; per-network API keys go in the corresponding sub-panels. For the partitioning in this setup (SkyBridge on BrandMeister, DIY on TGIF and/or cross-mode and/or DMR slot 2), the DIY hotspot’s network configuration mirrors the partition.
- Static and dynamic talkgroups — per-slot in the duplex configuration, which is the other major difference from the SkyBridge’s simplex setup. Slot 1 typically gets the always-on talkgroups for the slot-1-active networks; slot 2 gets the static set for the slot-2-active networks. See Vol 2 §6 (Talkgroup hygiene) ↗ for the deep discussion.
The dashboard’s Save button writes everything under /etc/pi-star/, restarts MMDVMHost, DMRGateway, and the per-mode gateway daemons, and shows the new state in the live panels within ~10 seconds. No reboot needed except for network-mode toggles.
3.1.4 Step 4 — Nextion display configuration
This is the step that’s unique to the DIY hotspot — the SkyBridge has no Nextion equivalent, just the small OLED. Two pieces of configuration are required.
MMDVMHost.ini Display setting. The Pi’s MMDVM configuration (under /etc/mmdvmhost/MMDVMHost.ini or the equivalent path in the current WPSD layout — the dashboard’s Configuration > Display panel exposes this) must specify Display=Nextion plus the serial port (Port=/dev/ttyAMA0 or /dev/serial0) and the baud rate (Baud=9600 for the WA6HXG v2.x layouts; Baud=115200 for the v3.x layouts that use the ON7LDS Nextion Driver). The WPSD dashboard sets these automatically when “Nextion” is selected as the display type and the right layout family is picked from the dropdown.
Nextion layout upload. The actual graphical layout the Nextion shows is a .tft file that has to be flashed to the Nextion’s own microSD slot (not the Pi’s), or alternatively uploaded over UART using the Nextion Editor running on a Windows PC. The microSD-slot method is the standard:
- Pick the matching HMI layout from
programs/wpsd-hotspot/Nextion Display/MMDVM-Nextion-Screen-Layouts-master/TFT Files/{24,32,35}/. For a 3.5” duplex Nextion the file isBlue1_Duplex_35in_LHnLHT_2.0.tft(or the Green1 variant); for a 3.2” duplex the file isBlue1_Duplex_32in_LHnLHT_GB_2.1.tft(the 2.1 version added the dual-last-heard feature and requires the “G4KLX Layout” setting in WPSD per the WA6HXG README, not the default Nextion layout — easy gotcha). - Copy the .tft to a FAT32-formatted microSD card (single .tft file in the root of the card; the Nextion’s bootloader looks for it).
- Power off the Nextion, insert the SD card, power on. The Nextion’s bootloader detects the SD, begins flashing the new layout, displays a progress bar, finishes in 30-60 seconds.
- Power off, remove SD, power on. The new layout is live.
The alternative upload path is the Nextion Editor (Windows-only; the programs/wpsd-hotspot/Nextion Display/nextion-setup-vLTS/NextionEditor.exe is the version archived, presumably the vLTS — long-term-support — release that was current at the time of the build). The Editor lets you edit the HMI source file directly (graphical layout, text-box positioning, font choices, button actions) and upload over UART when the Nextion is connected to the PC via a USB-to-serial adapter. This is the path for customising the layout — changing background colours, repositioning fields, adding pages — rather than just installing a stock one. The Editor’s manual is at programs/wpsd-hotspot/Nextion Display/MMDVM-Nextion-Screen-Layouts-master/Info Sheets/EDITOR NEXTION.pdf; the tutorial is NEXTION_Tutorial_v2.03.pdf in the same folder.
For ongoing operation, the Nextion just works — once the layout is loaded and the MMDVMHost is sending it data, the display updates in real time without further intervention. The maintenance task is updating the layout when the WA6HXG repo releases a new version (a few times a year), which is the same procedure as step 1-4 above with the newer .tft file.
3.1.5 Step 5 — WPSD updates
WPSD pushes updates frequently — the W0CHP project is actively maintained, with nightly builds and periodic stable releases. The dashboard’s Configuration > Update panel checks the upstream WPSD update server and applies updates in-place; configuration is preserved across updates. Cadence: the recommendation is to check the dashboard’s Update panel at least monthly, apply stable releases when they appear, and skip nightlies unless chasing a specific feature.
The contrast with the SkyBridge (Vol 21 §7 ↗) is that BridgeCom validates and signs off on releases before pushing them to SkyBridge units, so the SkyBridge is typically several weeks behind upstream. The DIY hotspot is on upstream timing; if an upstream regression lands in a nightly that the maintainers haven’t caught yet, the DIY hotspot may see it before the SkyBridge does. The mitigation is to back up the configuration before applying updates — see §5 (Network config backups) — so the rollback path is clean.
3.1.6 Step 6 — SSH and command-line access
Unlike the SkyBridge’s “officially unsupported” SSH posture (Vol 21 §4 ↗), SSH on the DIY WPSD hotspot is expected. The default user (pi-star, password raspberry, change on first login) has full sudo access; the filesystem layout follows the upstream Pi-Star convention with /etc/pi-star/ for daemon configuration and /var/log/pi-star/ for logs. Common SSH tasks:
- Tailing
MMDVMHost.logfor debugging — the real-time per-transmission log that shows every keyup, talkgroup, and BER value the modem decodes. - Editing
MMDVMHost.iniorDMRGateway.inidirectly when the dashboard’s UI exposes only part of the configuration — for example, fine-tuning RxLevel and TxLevel separately, adding custom DMRGateway rewrite rules, or experimenting with non-standard modem parameters. - Running
pistar-watchdogand similar Pi-Star utility scripts that the WPSD dashboard wraps but doesn’t expose for direct invocation. - Backing up the configuration tree via
tarorrsyncfor off-Pi storage, as a belt-and-suspenders complement to the dashboard’s Backup/Restore ZIP export.
The SSH access is a core differentiator vs the SkyBridge for the experimentation use case. Most operators most of the time don’t need it; specifically, it’s the reason the DIY hotspot is the “test new things” platform.
3.2 Network config backups
The configuration backup hierarchy in programs/wpsd-hotspot/ is several years deep and documents the migration path from original Pi-Star through WPSD, plus the supplementary Nextion-side files:
programs/wpsd-hotspot/
├── FBI_Surveillance_Van__3.nmconnection           ← current NetworkManager Wi-Fi profile
├── wpa_supplicant.conf.docx                        ← Wi-Fi credentials (wrapped in .docx — do NOT publish)
├── W0CHP - DMR config and notes.xlsx              ← per-hotspot config notes (talkgroups, API keys)
├── WPSD_Config_tjs-duplex_2025-Dec-29.zip         ← latest WPSD export (hostname tjs-duplex)
├── Pix - My HotSpot Build/                         ← 7 build photos from April 2022
│   ├── 20220420_104751.jpg
│   ├── 20220420_104831.jpg
│   ├── 20220426_141411.jpg
│   ├── 20220426_141424.jpg
│   ├── 20220426_141436.jpg
│   ├── 20220426_142804.jpg
│   └── 20220426_142815.jpg
├── Nextion Display/                                ← Nextion HMI source + layouts + tooling
│   ├── EDITOR NEXTION.pdf                          ← Nextion Editor manual
│   ├── NEXTION_Tutorial_v2.03.pdf                  ← display tutorial
│   ├── Status Codes and Fields.txt                 ← MMDVM-Nextion command reference (GitHub snapshot)
│   ├── STEP Files/                                 ← 3D reference geometry
│   │   └── Raspberry Pi 4 Model B.STEP             ← Pi 4B model — design-time reference
│   ├── MMDVM-Nextion-Screen-Layouts-master/        ← WA6HXG layout repo snapshot
│   │   ├── HMI Files/{24,32,35}/                   ← editable Nextion Editor projects
│   │   ├── TFT Files/{24,32,35}/                   ← compiled binaries for direct upload
│   │   ├── Info Sheets/                            ← Editor manual + tutorial + status codes
│   │   ├── Instructions.md                         ← README
│   │   └── README.md                               ← WA6HXG version history
│   └── nextion-setup-vLTS/                         ← Nextion Editor vLTS (Windows .exe + DLLs)
│       └── NextionEditor.exe                       ← the layout editor itself
└── pi-star-legacy/                                  ← pre-WPSD archive (March-April 2022)
    ├── Pi-Star_Config_2022-Mar-24.zip               ← first WPSD-precursor backup (24 March 2022)
    ├── BridgeCom_Pi-Star_Config_2022-Mar-26.zip    ← BridgeCom-skinned Pi-Star backup (26 March 2022)
    ├── Pi-Star_RPi_V4.1.5_30-Oct-2021.zip          ← original Pi-Star v4.1.5 image (October 2021)
    ├── Pi-Star_RPi_V4.1.5_30-Oct-2021/             ← unzipped form of the same
    ├── Saved Config Files/                          ← intermediate per-config snapshots
    ├── Duplex/
    │   └── Pi-Star_Config_pi-star-duplex_2022-Apr-20.zip  ← duplex config at hostname pi-star-duplex
    ├── Simplex/                                     ← (currently empty in archive)
    ├── NEXTION_Tutorial_v2.03.pdf                   ← duplicate of the tutorial PDF
    ├── js_composer.zip                              ← unrelated WordPress plugin (left in archive)
    └── themeforest-...wordpress-theme.zip          ← unrelated WordPress theme (left in archive)
A few observations about the archive structure that reflect the build’s history.
The presence of both Pi-Star_Config_2022-Mar-24.zip (vanilla Pi-Star) and BridgeCom_Pi-Star_Config_2022-Mar-26.zip (BridgeCom’s customised Pi-Star variant) two days apart suggests the BridgeCom dashboard skin was initially tried on the DIY hotspot (presumably as a cross-reference against the SkyBridge’s customisations) and then reverted to vanilla Pi-Star within the same week. The legacy Pi-Star_RPi_V4.1.5_30-Oct-2021.zip is the actual upstream Pi-Star image from October 2021 — the starting point of the build, before any customisation.
The Pi-Star_Config_pi-star-duplex_2022-Apr-20.zip in pi-star-legacy/Duplex/ is the earliest dated configuration that explicitly references duplex operation; the build photo timestamps (April 20 and April 26) align with this date, suggesting the duplex MMDVM hat was installed and configured during the same April 20-26 window that the case was assembled.
The current backup WPSD_Config_tjs-duplex_2025-Dec-29.zip (December 29, 2025) is the WPSD-era equivalent — by this point the migration from Pi-Star → WPSD has happened, the hostname has been changed from pi-star-duplex to tjs-duplex, and the configuration is in the WPSD-specific format with the W0CHP dashboard customisations. The gap between Pi-Star April 2022 and WPSD December 2025 reflects an “if it’s working, leave it alone” stance — the migration happened when the WPSD upstream had matured enough to be worth the move.
3.2.1 Backup cadence
The recommended cadence for the DIY hotspot is:
- Before every WPSD update. Always. The update is in-place and usually preserves config, but if it doesn’t (the rare case where a major schema change happens), having the immediately-pre-update ZIP is the rollback path.
- After every meaningful configuration change. A new talkgroup added to the static set, a network added or removed, a frequency changed, an API key rotated, a Nextion layout swapped. Anything that would be painful to reconstruct from memory if the SD card failed tomorrow.
- Quarterly. A defensive belt-and-suspenders backup that catches any incremental drift that the “after every change” rule missed.
- After any major build change. New MMDVM hat, replacement Pi, enclosure swap — anything that touches hardware that the configuration depends on.
Each backup is the WPSD dashboard’s Configuration > Backup/Restore > Download a ZIP. The convention is to name them WPSD_Config_<hostname>_YYYY-MMM-DD.zip to match WPSD’s own filename timestamping; the current backup WPSD_Config_tjs-duplex_2025-Dec-29.zip follows this convention.
3.2.2 Restore workflow
The recovery path if the SD card fails or the WPSD installation corrupts:
- Flash a fresh WPSD image to a replacement microSD card per §4 step 1.
- First-power-up onboarding — Wi-Fi captive portal or Ethernet, configure home Wi-Fi credentials, get the Pi on the network.
- Log into the dashboard, change the default password.
- Configuration > Backup/Restore > Upload
WPSD_Config_tjs-duplex_<latest-date>.zip→ click Restore. WPSD unpacks the saved config tree, writes back the daemon configurations, the modem parameters, the network credentials, the talkgroup subscriptions, and restarts the daemons. - Reconfigure the Nextion if the SD-card replacement also wiped the Nextion’s flash — flash the
.tftfrom the Nextion HMI archive per §4 step 4. - Verify the dashboard shows the expected callsign, DMR ID, frequencies, talkgroups, network connections; key the D878 on the configured frequency and confirm the hotspot’s TX LED and the dashboard’s Last Heard show the transmission.
End-to-end recovery: 30-60 minutes given a fresh SD card, the most recent WPSD_Config ZIP, and the Nextion .tft. Without the backup, the recovery is from-scratch (re-entering all the configuration items by hand) which is longer and risks missing edge-case settings. The W0CHP - DMR config and notes.xlsx spreadsheet is the cross-check that’s not in the ZIP — it carries the talkgroup map, the frequency plan, and the cross-reference notes that the dashboard doesn’t surface.
3.2.3 What to NOT publish
Two files in the archive contain semi-sensitive content and should never be committed to a public repo or shared in a public-website handoff:
wpa_supplicant.conf.docx— carries the home Wi-Fi PSK in cleartext.FBI_Surveillance_Van__3.nmconnection— same PSK in NetworkManager format. The.gitignoreshould exclude both, or they should be flagged for redaction before any public-website sync. SeeHack Tools/CLAUDE.mdfor the analogous handling ofMY_GEAR/inventory.yaml.
The WPSD_Config_tjs-duplex_*.zip may also contain BrandMeister and TGIF API keys (the per-network authentication tokens that the dashboard configures); these should be treated as semi-sensitive too. Rotating the API keys on the network’s website is cheap and easy if a backup leaks.
Comments (0)